Biyernes, Oktubre 30, 2015

Where to Start: Beginning a Laminate Flooring Installation

Dear Bob and Betsy,
I have my laminate and it’s acclimatizing now but I’m getting nervous about beginning a laminate flooring installation. I’ve never done this before and I want to make sure I start it right. Any tips to help?
-Sian L.

Dear Sian,

Many people can relate to your nervousness to start a laminate flooring installation. The beginning of any big project is critical. You want to start it on the right note so everything runs smoothly.

You’re in luck! A laminate flooring installation doesn’t require years of on-the-job training and experience. It’s ideal for DIYers.

To help you enjoy the process and begin in the best way, here are a few tips.

Gather Your Tools

One of the best ways you can ensure having an easy installation experience is to have all of your tools ready.

There are a few tools you’ll want to gather before beginning. For a full list of tools needed for a laminate flooring installation, click the link and check out our answer to Brian’s question earlier this year.

Decide on Your Direction or Pattern

Which direction are you planning to lay your laminate flooring? Decide this before you cut any pieces or start measuring. Give yourself a small square to work with and set down a few planks to decide on the right direction for your home. Don’t’ forget to stagger your planks. This will give a more natural look.

Will you add a pattern, such as chevron or scattered colored planks? This requires a little extra planning on your part. Lay down your planks to gauge how you will install your floors. This will also help you determine where you need to make cuts.

While doing this, try to make sure you will end up with a row that is at least 3 feet wide. This will save you from cutting and make it easier to finish up the room when you’re close to completion.

Measure it Out

With your direction or pattern in mind, start measuring where you’ll need to make cuts. Remember, you will need to leave room for an expansion gap. This should be a quarter inch. Placing spacers can help you keep the gap consistent around the room.

Read All of the Manufacturer Directions

Reading the directions and getting a feel for the installation will be very beneficial before starting. Following the instructions is important to maintaining the warranty and avoiding damage. If you’re confused at the directions, try to search for a video tutorial online or call one of our flooring experts for some help.

Start Small

Don’t overwhelm yourself with making all of your necessary cuts right away. Start small and gradually make cuts as you go. You’ll soon get the hang of it and find yourself getting into a steady rhythm.

Any other questions? We’re here to help! Contact our flooring experts by phone, chat or email anytime for a quick response.

Learn More:

The post Where to Start: Beginning a Laminate Flooring Installation appeared first on Passion for Home - Bestlaminate Blog.

DIY Halloween Skull Garland (& Free Printable!)

DIY Halloween Skull Garland
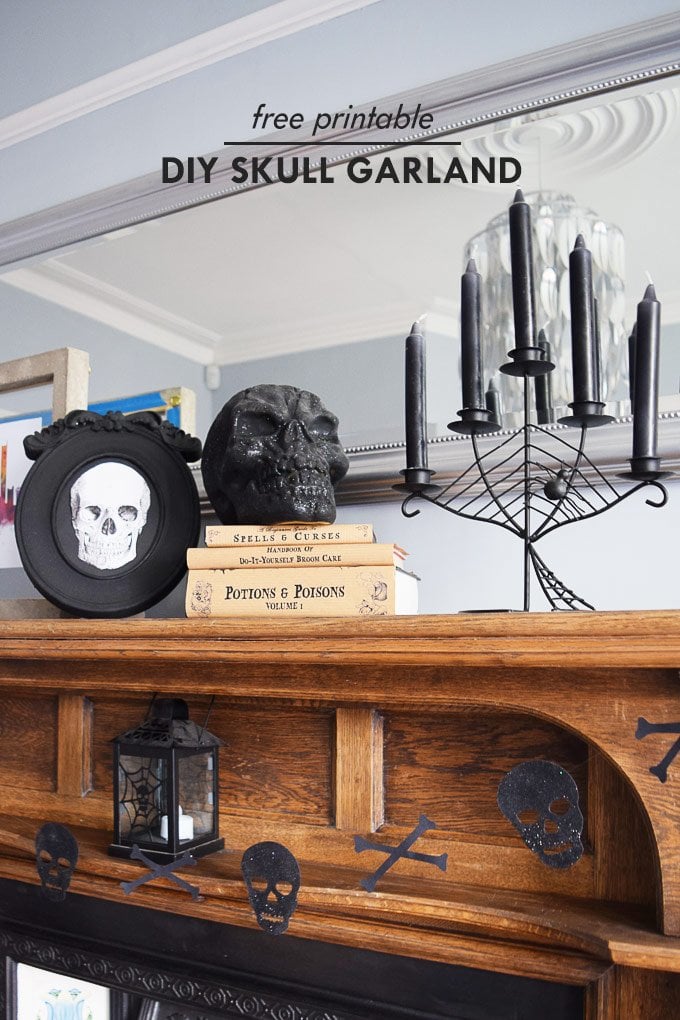
With Halloween just around the corner, we thought we’d squeeze in one quick last minute project – a DIY Halloween Skull Garland. I promise it is really easy and quick to make and it’s a perfect if you’re after some last minute Halloween decorations. This is what you will need: Black cardstock (this is what... 

Read More »

The post DIY Halloween Skull Garland (& Free Printable!) appeared first on Little House On The Corner.

Huwebes, Oktubre 29, 2015

40 Must-Have Christmas Tree Decorations!

40 Must-Have Christmas Tree Decorations!

It’s the time of year again: the time of year when I design some stylized Christmas tree shopping boards!

Each year these boards become very popular on Pinterest, many of which are still getting rePinned today and bringing me lots and lots of lovely traffic. ;-)

Unfortunately though, many of the links contained within those older posts are now dead. Unlike furniture or accessories, holiday item product links go dead mostly when the season is over. They rarely last until the next year. :-(

We’ve had a few people message us inquiring about some of the products I’ve featured within those shopping boards, and I just hate that we can’t find some of them anymore. I loved those boards, and I worked hard creating them. I, too, don’t want to see their value disappear!

if so, subscribe to DESIGN REFRESH, my monthly newsletter featuring design tips & tools that will have your home looking fresh and new in no time!

Thank you!

So, in an effort to revive that Christmas spirit those links were unable to keep alive...

I’ve designed some new shopping boards; shopping boards that imitate many of those looks you love throughout years’ past. And yes...these products are available for purchase this season, here in the year 2015!

So, for those of you who have arrived at this article by way of one of those posts of Christmas’ past, I’ve got new links for you down below!

Btw: If you discover that I haven’t updated one of the shopping boards you’d like to buy something from, let me know in the comments below so I can immediately begin tracking down a new link to replace the one that’s no longer working.


10 Must-Have Contemporary Christmas Tree Decorations!

A

Wood Garland

B

Glitter Cut Drop Ornament

C

Brass Ornament

D

Mercury Glass Bulb Lights

E

Paper Balls

F

Diamond Ornament

G

Pantone Ornament

H

Wooden Stars

I

Tree Blanket

J

Glitter Ball Ornament

CLICK HERE For 10 More Must-Have Contemporary Christmas Tree Ornaments!


10 Must-Have Bohemian Christmas Tree Decorations!

A

Feather Ornaments

B

Capiz Star Treetop

C

Agate Ornaments

D

Metallic Bird Ornaments

E

Crocheted Angel

F

Ikat Ornaments

G

Glass Marble Ornaments

H

Birdcage Ornament

I

Jubilee Garland

J

Ikat Tree Skirt

CLICK HERE For 10 More Must-Have Bohemian Christmas Tree Ornaments!


10 Must-Have Manly Christmas Tree Decorations!

A

Driftwood Garland

B

Glitter Cork Ornament

C

Star Tree Topper

D

Silver Bells

E

Drop Ornament

F

Drop Ornament

G

Mistletop Ornament

H

Glass Ornament

I

Glass Ornament

J

Octagon Tree Blanket

CLICK HERE For 10 More Must-Have Manly Christmas Tree Ornaments!


10 Must-Have Rustic Christmas Tree Decorations!

A

Wreath Ornament

B

Aviary Ornaments

C

Tree Topper

D

Pinecone Garland

E

Metal Ornament

F

Bird Ornament

G

Glass Ball

H

Glass Ball

I

Glass Ball

J

Tree Skirt

CLICK HERE For 10 More Must-Have Rustic Christmas Tree Ornaments!

Miyerkules, Oktubre 28, 2015

Studio Tour

Hello! As promised today I’m featuring a tour of the studio above our two car garage. We added this space seven years ago, it has a kitchen, bathroom, laundry room, and walk in closet all contained within 600 square feet. It’s been rented to tenants in the past, used for storage, used for styling my fabrics, and for hosting Matt’s poker night.

My stepdaughter lived here for 1½ years after college, but now she’s moved to San Francisco. We envision renting it out again someday as an AirB&B after we create private access with a new staircase. Until then, it’s used as a library to store many of my books and collected objects, I like to escape here to read a few times a week. It’s also a space for friends and family to stay when they visit.

olive green studio bookshelves

I redecorated it over the last month, bringing up furnishings and accents that used to live elsewhere in our house but have since been replaced (the rug, club chairs, etc.) I also bought a few new things to make it stylish and cozy (the coffee table, pillows, linens).

You’ll recall several years ago we added the Billys to built in bookshelves, such a smart move for storage on a blank wall! I have plans to add shelves above to take the bookcases up to the ceiling and also install lights (I love the look of Nate’s bookcases) but that will have to wait until next year. I recently painted the backs with Glidden’s Alligator Pear, replacing the deep teal blue with warmer olive green. The entire space has an analogous color medley of navy and olive.

olive painted bookcases

books decorative objects

  olive green backed bookshelves

olive green painted bookshelves

On the opposite side is the bedroom where I have two mismatched nightstands, the white paint and ring pulls tie them together. That dresser used to be navy blue, I painted it white again and the rings and fretwork gold. I was forced to hack the bottom four inches of the legs off when I realized the smaller chest on the right I had ordered was shorter (desperate times call for desperate measures) but at least the lamps sit at the same height now – it was bugging me when they weren’t.

navy white bedroom centsational girl

The genie lamps are Nicole Miller from HomeGoods I love that the indigo finish is matte not gloss. The little glass knot is from Target, the Greek key trim is from M&J Trimmings, one of my favorite ways to embellish plain linen window panels.

white dresser with overlays navy lamp

The triptych of art prints I found on Etsy, I framed them with inexpensive frames found at Michaels that I spray painted gold. The green pillows any navy quilt are both from Target, the watercolor floral fabric called ‘Blue Floral Splat’ at Joann’s and sewed a lumbar pillow cover with it.

navy white green linens

green and floral pillow

navy quilt white furnishings

The entrance to the kitchen is just off the living room. Years ago I painted the kitchen cabinets white, it still looks the same, view the kitchen here. And there’s that $10 cabinet that is still one of my most popular thrift store makeovers.

kitchen entrance

I have a wood pedestal table and pair of chairs in here too, there’s a peek of one below. You can see them together here.

wide bookcase view

contemporary coffee table olive green bookcases

With a controlled color palette you can mix patterns and styles with abandon, both traditional and contemporary. The patterned window panels are from West Elm, the loveseat is IKEA Ektorp, I recently bought the gray cover to use instead of the white.

loveseat club chairs coffee table

Pillows on the club chairs are also from West Elm, the pillows on the loveseat are from Pier One. The rug I bought at Overstock last year.

flowers in mirrored tray

studio bookshelves with club chairs

Between the loveseat and the French doors there was room for a desk, since our oldest couldn’t fit her desk and chair in her tiny San Francisco apartment she left it here and it works perfectly in this space!

desk view living room

This is a nice little spot to pull out a laptop. The mirror used to hang in our living room above the mantel, I’ve since replaced it so I moved it up here. I love the chain link frame. The lamp is from Target.

Centsationa

chain link mirror and lamp

vase with bed beyond

coffee table desk flowers

I’ll add more links to the products seen (if available) to the Shop page later today. If you have questions about something in particular, just ask. Until then, hope you enjoyed the studio tour!

..

Transitional Bedroom Decor Tips – Growing from Toddler to Teen

It’s one of the greatest joys of parenting – raising your child. It’s rewarding, fun, and exciting. Still, as much as you love your little ones, raising them can also be incredibly pricey! As they age, they need new clothes, new furniture, and new décor.

If you’re struggling to save money on transitional bedroom decor, here are some tips on how to make the room a place of growing, without spending big bucks on a full makeover at every stage.

Flooring

Wood laminate flooring is a classic and durable choice for a child’s room that will work well with any décor. No need to worry about markers, toys or playing with a laminate floor! Additionally, a large area rug is a budget friendly way to capture each stage of childhood by switching it out for a new one through out the years.

San Francisco Media & Bloggers Lucy McLintic

Wall Colors

Along with flooring, wall colors set the tone for any room. One way to allow for changing childhood tastes is to paint the walls a neutral color with one wall reserved as an accent wall. The accent wall is easier and cheaper to update over the years rather than repainting the entire room. You can start with a solid and soothing color for a nursery and change it to a vibrant bright color, create patterns, or add fun wall decals to suit your growing child’s tastes.

Boston Architects & Building Designers Stern McCafferty

Timeless Furniture Choices 

The key to creating a room that will easily transition from the toddler years through the teen years is to invest in durable, quality furniture that can last through the years. These days, there are many options when it comes to finding cribs that are made to transition from a crib to a toddler bed and finally into a double-size bed. Additionally, there are dressers that have removable changing tables. With the bed and dresser taken care of you should also consider bookshelves and an armoire (depending on closet options).

Charlotte General Contractors Andrew Roby General Contractors

Storage Is Critical 

As your child grows storage solutions will be critical. You can save space by buying baskets, buckets, or wooden crates that can be interchangeable and stored in a bookshelf or under the bed. In order to maximize the storage in your child’s room, make a point of cleaning out outgrown clothes and toys that are wasting space to make room for new items.

San Francisco Design-Build Firms building Lab, inc.

Personal Touches 

Since a bulk of your child’s room will stay the same as they grow, personal touches are what will make their room special. These touches can come in the shape of bedding (such as character sheets in their younger years and something more mature and chic in their teen years), pictures, accessories, and wall art. All of these things are easy to change out and won’t break the bank to update.

New York Photographers CM Glover

Do you have any tips on how you’ve decorated your kids’ rooms over the years? Share your tips below.

More Kid-Friendly Ideas:

The post Transitional Bedroom Decor Tips – Growing from Toddler to Teen appeared first on Passion for Home - Bestlaminate Blog.

Loft Planning Progress – We’ve Made The First Interior Decision*

Loft Conversion Floor Plan
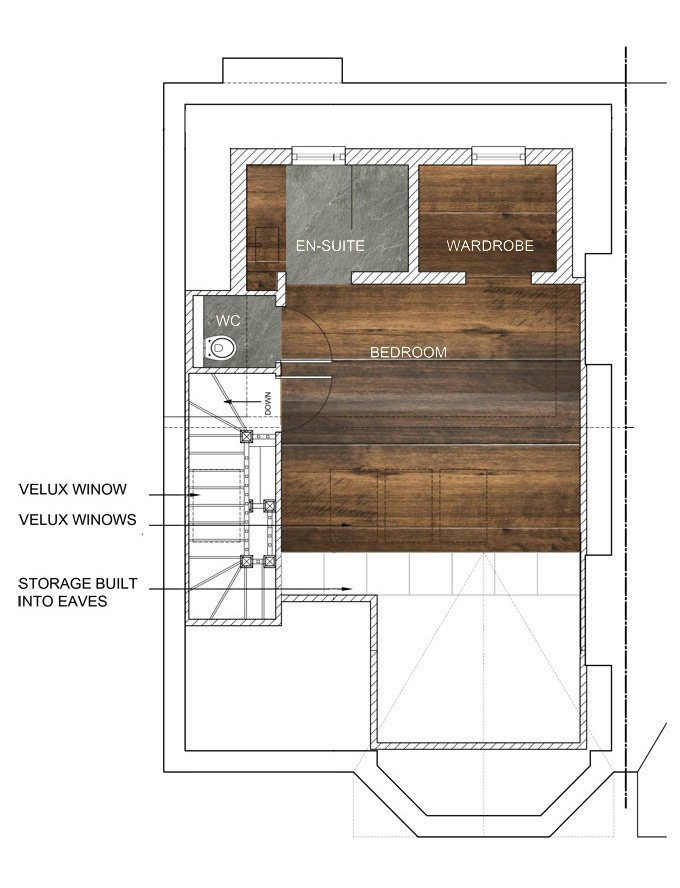
Although we still don’t have a confirmed start date for building work to start on our loft conversion, we have started to make some progress on planning what the space will look like. We already have planning permission and therefore we already know the size and shape that the rooms in the loft will be,... 

Read More »

The post Loft Planning Progress – We’ve Made The First Interior Decision* appeared first on Little House On The Corner.

Martes, Oktubre 27, 2015

Minted Favorites + Giveaway

It’s always exciting to be invited to a favorite company’s headquarters, and last week I had the opportunity to meet the Minted team for a gathering in downtown San Francisco. They were hosting an early holiday event to show off their newest collection of cards and fabrics and I was happy to attend. They invited a group of bloggers and stylists to mix and mingle then enjoy a meal together, it was festive and fun and I met and made new friends.

minted table

I’ve bought so many art prints and cards from Minted over the years, so it was exciting to see their newly renovated office space with its white brick walls and rustic wide plank wood floors laid in a herringbone pattern. My iPhone failed to capture… but it was just lovely.

Minted is very on trend (and often ahead!) when it comes to the artwork they sell, every print is so fresh and modern – they partner with independent emerging artists who create contemporary artwork in many styles.

minted art

My four favorites right now, I’m a sucker for a beautiful botanical.

minted favorites

ink cyclamen / foliage / flutter watercolor / inked kumquat

Ho ho ho, you know the holiday are coming up quick! Minted has many holiday cards to choose from, envelopes too, I’ve already narrowed down my selection for our family.

minted holiday cards

TheMintedEnvelope

Minted has expanded beyond art and stationery, they sell fabrics too! Multiple colorways are available for each pattern – they also sell their artist’s fabrics as pillows, curtains, and lampshades.

minted fabrics

 Today the team at Minted is offering three lucky winners a $100 online shop credit – just in time for those holiday cards, but no need to spend it there, you can use it for anything from stationery to art to fabric if you’re one of the lucky winners.

Enter to win one of three $100 online store credits to Minted via the Rafflecopter widget below with your name and email:

a Rafflecopter giveaway

Good luck!

[Hardwood Flooring Tips] Holiday Parties & Your Floors

As you begin to think about upcoming holiday parties, are your hardwood floors on your mind? This time of year, it’s not uncommon for flooring to take on extra wear and tear from extra people in your home, moving furniture around and more. How can you protect it? Keep reading for 6 tips.

6 Hardwood Flooring Tips for Holiday Parties

1. Invest in quality finish up-front. The good news is, if your hardwood floors are protected with a good finish there really isn’t a lot you need to do; it serves as an extra form of protection against scratches, dents and liquids. Still, even with a high quality finish, make sure you clean up any spills as quickly as possible.

2. Move furniture carefully. Although high heels are also blamed for most damage to the hardwood flooring, the truth is that moving furniture around is more likely to damage your floors. As you rearrange, make sure you pick up chairs, tables and other items instead of sliding them from one space to the next. You may also want to use furniture pads for a little extra protection.

3. Add mats to your doorways. The elements, especially during the winter, can be especially hard on your hardwood floors. Make sure each entrance to your home includes a durable mat for guests to wipe their shoes on; this will significantly decrease the moisture and dirt tracked around your home.

4. Ask guests to remove their shoes. If you’re really concerned about friends’ shoes damaging your hardwood floors, warn them that you’ll ask them to remove them upon arrival, or even offer a pair of slippers or festive socks for them to wear as a gift during the party. This will also keep your flooring cleaner and prevent dirt and germs from being tracked around your home.

5. Invest in a few area rugs. In addition to adding a decorative element to your home, area rugs and runners in high traffic areas of your home can protect your hardwood flooring from dents, dings, scratches and spills. After the party is over, they’re easy to store or move to another room depending on the overall décor of your home.

6. Clean your hardwood floors. As always, maintain your hardwood floors by taking care of them. This blog post about floor care shares a nice schedule for you to follow year-round.

Want to know more about protecting your hardwood flooring during the busy holiday season? Come visit our showroom and talk to our floor experts about any specific species or styles you have questions about! Make sure you contact us for a free in-home estimate, too.

GRAND OPENING: The 'DESIGNED w/Carla Aston' Outlet Store!

designed_outlet_logo_carla aston_rectangular.jpg

Have you noticed the new link on my left sidebar yet? If you haven’t...

Please take a look! I’ve opened a new outlet store within my website, and I’m excited to share it with you today. ;-)

if so, subscribe to DESIGN REFRESH, my bi-weekly newsletter featuring design tips & tools that will have your home looking fresh and new in no time!

Thank you!

Why an outlet store? Well…

You see, designers always end up having extra goods after a project’s completion. We overbuy at markets thinking we surely have someone we can sell a certain-something to; or we’ll have leftovers after having to buy in bulk in order to get what we need for a particular project. And then, of course, there’s the occasional snafu. :-(

In any of these cases, unloading these items to someone else can be difficult, either because they’re totally unrelated, custom, or just downright unique!

However, if you’re someone who’s always on the lookout for designer goods and discount prices, then look no further because…

My Outlet Store is here! ;-)

Lunes, Oktubre 26, 2015

New & Improved

Hello everyone! You all know I love a great makeover – today’s is website related. I’m happy to announce that the new and improved Centsational Girl has finally arrived! Yesterday we launched the new site, I’m so delighted it has a fresh look and modern design and that it is finally mobile and tablet friendly, hooray!

new and improved centsational girl

Six years ago I hired someone to build a WordPress blog for me and I was *still* operating on that outdated theme until yesterday. I was having all kinds of problems with it due to changes in code and SEO policies, also the old look was a bit of a plain Jane, remember?

old design

When Google made their big announcement earlier this year that sites get penalized for not being mobile friendly (booo!) and after several readers inquired when it would happen, I decided over the summer to get busy on a site makeover. My first thought was, hey it can’t be that hard to just switch to a mobile friendly theme, right? Being a DIYer at heart I thought I could do it all myself.

I thought I could just buy one of those pretty themes with everything preset and install it, I paid $50 for one #becauseimcheap and set up a demo site to make all the changes and thought I could just import them. Cue that music in the movie when something bad is about to happen but the main character doesn’t see it yet. That resulted in crashing my server several times and sending my site offline for hours – I tried it over and over again with fingers crossed hoping for the best and generating even more problems, so I knew it was finally time to talk to professionals.

For some random reason, I stumbled across this lovely blog and this lovely blog in the same week and noticed they were both designed by the same team at Roundhouse Designs. I liked what I saw so I emailed them, explained my problem and in 24 hours they had me on the phone. I proposed a band aid fix. “Can’t you just install the cheap theme I bought?” They didn’t laugh at me. They should have but they didn’t. Maybe they did laugh when I wasn’t on the phone.

They should have laughed – they probably cried instead – because we learned all those band aids I’d been using for years on my old theme were causing plugins to compete with each other for attention thus causing my blog to “slowly implode from within”. Their words. That was not the description I wanted to hear about the blog I’ve been filling up with content for six years. Cue the music in the movie when the main character realizes it’s time for a change.

So we started from scratch and the guys at Roundhouse (Ryan and Nick) built me a brand new site with all the bells and whistles I needed to be modern and continue to deliver new content, and they imported all the old content from the old site.

You’ll notice we replicated much of what was already in place – I liked the basic layout so you’ll see similarities. But instead of all the hand coding I’d been doing for years, now there are simple buttons to click to make it all oh so purty and organized.

Thanks so much guys!

nick and ryan

The priority was organized easy navigation. The guys installed a slider up at the top of the content that rotates the not-to-miss articles from the past month, just in case you haven’t visited in a while. I love that.

I like a site where it’s easy to find content, good navigation is a big deal for me. My content is split between decorating articles and DIY projects/space remodels and I wanted to make it easy for long time readers and new visitors to find it all, so just as before you’ll find all the best decorating articles and resources in one of the main categories, the STYLE FILES, easily found from the navigation bar.

style files

You’ll also find all of my DIY projects and remodeled spaces on the PROJECTS page, again just like before.

projects page

New to the blog is a page called SHOP dedicated to all the objects I love with categories for furniture, textiles, lighting, and accents. It’s here I share so many of the things I own or have used to decorate spaces, and other favorites too – I’ll be filling it with more finds in the weeks to come.

introducing shop

With any blog design there are a million choices to consider. The editorial look is used now by many magazines and large blogs and has grown in popularity but I wasn’t ready for that yet. Since it’s only me and I post 3-4 times a week it didn’t make sense to switch to an editorial layout, so I kept the basic “new content on the front page” blog design in place, plus I love when I can see the new content right away when I visit a blog, especially a personal one that’s not run by a huge team.

As for the color palette, I decorate with and wear a lot of navy, teal, and dark pink so those colors have been incorporated into the new design. The lovely logo is by Jamie at Fresh Lavender Designs, it’s feminine and fun with pretty floral detail, and a nice contrast to the sans serif fonts used throughout the galleries.

new header with floral detail

Once more, I give huge props to the guys at Roundhouse Designs, they were a great team to work with, eternally patient, wicked smart, and they have great personalities too. Fellow bloggers, if you’re looking for a design team, I highly recommend!

So we’ve cleaned out the cobwebs and swept all the dust out from under the rug that existed on the old site. It took hundreds of hours to categorize and organize everything, and there are still a few details that remain. It’s a brand new day with the brand new site! Hop on over to the blog if you’re reading via email or RSS subscription to see the clean and contemporary look, hope you like it!

More good stuff happening this week including pictures of the studio… be back soon!