Busy with hectic deadlines? Rushing home to get dinner on the table? Chances are you don’t have time to get away for a relaxing weekend somewhere. What you need is a retreat from the ordinary. What you need is your personal oasis.
Master bedroom design should feel inviting, relaxing, and most of all, decompressing. It should be your retreat from the daily grind. When you walk in, you should breathe a sign of relief. You’re home.
Here are a few ways you ways you can create a master bedroom retreat to help you wind down and relax in your own home.
Wall Color
The color of your walls has the biggest impact and sets the mood for the entire room. It’s important to choose neutral colors that create a relaxing atmosphere such as gray, cool blue, soft green, and other soft tones.
With cool and neutral walls you can choose bedding and curtains that coordinate but add interest. For example, crisp white curtains up against cool blue walls or beautiful aqua paired with gray walls.
Most of what you’ll be doing in your relaxing retreat is sleeping, so the more comfortable the better. To maximize your comfort, the mattress and bedding should be the area where you dedicate a good chunk of your budget. Even if you can’t get a new mattress, a new set of quality sheets can add a luxurious feel to any bed.
Columbia Interior Designers & Decorators Steven Ford Interiors
Flooring
To go with the neutral, cool walls pick rich colored hardwood laminate flooring. Hardwood floors will add another layer of sophistication to create the relaxing getaway you’re going for.
As the finishing touch, add a soft area rug under your bed so that it’s the first thing your feet touch when you get out of bed.
Toronto Interior Designers & Decorators Shirley Meisels
Sitting Area
If space allows, a sitting area is a perfect addition to a master bedroom retreat. A comfy chair with a side table and lamp will offer a cozy spot where you can relax drinking your morning coffee or kick back with a good book.
The Woodlands Architects & Building Designers JAUREGUI Architecture Interiors Construction
Make Your Bed
This might sound like an odd decorating tip, but it’s a good one. Make your bed, every day. If you’re going to invest the time and effort to create a relaxing getaway space then you should go the extra mile and put the finishing touch on it. That way, when you’ve had a crazy day, walking into your master bedroom will be comforting, clean, and inviting.
Kansas City Interior Designers & Decorators McCroskey Interiors
When someone comes to me and tells me they want to remodel their kitchen my heart skips a beat. Whether it’s a friend or another blogger or an email from a reader, all of a sudden I’m engrossed in their story and want to know about their plans because I just LOVE a great kitchen remodel story!
This year we completed two kitchen remodels (this one and this one) and I’m about to begin a third! My younger brother and my sister-in-law have requested my help in remodeling a kitchen in a home they just purchased here in the Bay Area. I’m thrilled for them and can’t wait to get started! The question from my SIL who is a busy nurse with two small children (a toddler and newborn, I remember those days!) asked me (insert sigh) “Where do we begin?”
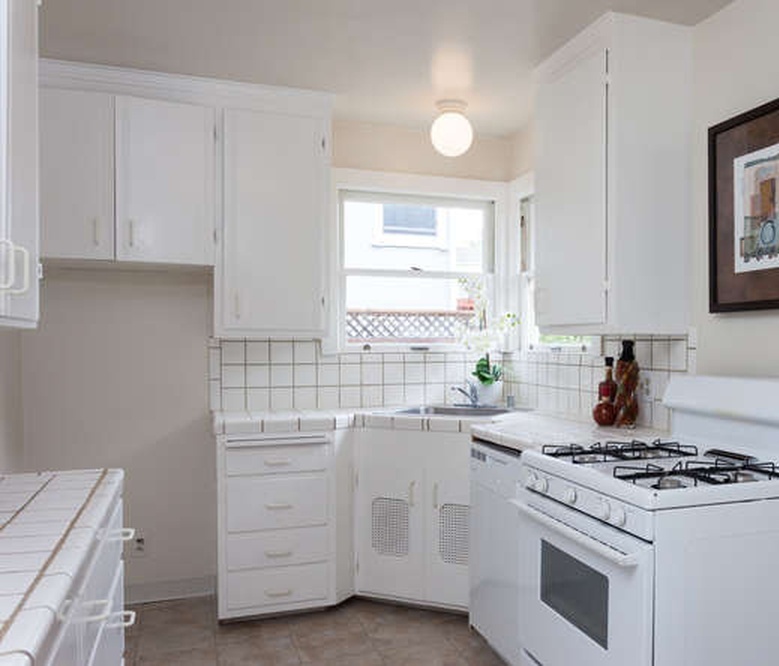
Here is one angle of the kitchen in the house they just purchased, it’s neither large nor functional, and with two small children and two working parents, it needs to work with their lifestyle, so I’m excited to guide them along in their remodeling journey.
Sooooo… what’s my best advice on how to begin? These answers are more generic but relevant to anyone who is pondering a kitchen remodel:
Reface or Remodel? Are we looking at a kitchen that’s functional but just not your style? Are the existing cabinets quality? Does the layout make sense? In that case you’re probably in a situation where it’s best to reface or repaint cabinets and perhaps upgrade appliances and the backsplash. New doors, countertops, and tile can go a long way to transforming a kitchen with a layout that makes sense but just needs a refresh. Cosmetic remodels are far easier to tackle than a completely renovated space.
Architectural or Structural Issues. If you’re in a situation where the layout doesn’t make sense or the cabinets are really old and you want to start fresh with new everything then the first thing to consider is architectural or structural changes. Is it feasible to take down walls or move appliances around? Both issues should be addressed with a general contractor because they can impact the cost significantly and may require permits.
Hire the Right Professionals. I have some friends in my hometown who are about to begin their kitchen remodel, yet another project I hope to blog about! Their first question to me was “Do you know a good contractor?” which is a very important step! The best way to go about hiring a contractor to do any structural changes or installation is word of mouth by talking to people in your area, also through websites like Angie’s List, or look at portfolios on websites like Houzz. Interview 3-5 and work with someone who gets you, who understand what you want, and who you establish a good rapport with.
Flow. Before meeting with a contractor and even coming up with a cabinet plan, always consider flow. A good kitchen cabinet designer can help you with this process. In a kitchen with an island there must be proper spacing around it: 42” at a minimum preferably 48”. The cabinet and appliance plan must make sense! For maximum efficiency, keep in mind the work triangle – that connection between the sink, refrigerator, and range. Think about where you want to be when you prep your food, cook your food, and then serve your food.
Cabinet Design. This is where you get to pick what suits your style, choose kitchen cabinets with a wood or painted surface and also consider functional upgrades, smooth glide drawers or pull out recycling. If you plan to sell the home in less than a few years, it’s best to make choices that will appeal to a wider market.
Storage. One modern kitchen trend that is gaining in popularity is to remove upper cabinets and replace them with pretty tile to make the space feel less cramped or to add open shelves, but this can limit your storage options. There are so many different ways to approach storage and other considerations like where to place a microwave, so it’s good to work with an experienced kitchen cabinet designer.
I find it most helpful to make a list of everything you use on a daily basis that you will store from dishes to cookware to small appliances and identify the cabinet where it will go. It doesn’t all have to be stored in the kitchen, dishes can go into the dining room, seasonal or infrequently used items can go in the garage, attic, or basement.
Be Realistic. Budgeting for a kitchen remodel needs to include all the expenses from cabinets to countertops, appliances and fixtures, labor, and all the tiny details in between. Cliq Studios offers a quick quote to give you a ballpark idea what a cabinets will cost. As I mentioned in this article on lessons learned from our most recent remodel, building in a 15-20% “unexpected expenses” cushion is wise. Also it’s my experience kitchen remodels always take twice as long as planned, so if you think it will be done in four months, plan for eight!
During a full kitchen remodel, the process generally goes in this order: 1) demolition, 2) architectural changes and new drywall, 3) prep electrical in preparation for appliances/light fixtures (also gas line if moving gas appliances), 4) install flooring.
Once the scene is set then 4) install cabinets (I recommend professionally), 5) fabricator creates countertop template 6) connect plumbing 7) install countertops, 8) install sinks and appliances (again I recommend professionals), 9) trim cabinets, 10) install tile backsplash and hang open shelves (if any), 11) attach hardware.
_ _ _
For those of you who have gone through a kitchen remodel, tell me what you wish you knew in the beginning that affected your renovation? What advice can you share based on your experience on where to begin when considering a kitchen remodel?
*This post is sponsored by Cliq Studios, all opinions are my own, see the kitchen designed with Cliq Studios cabinets here.
It’s no secret we love hardwood flooring here at San Jose Hardwood Floors. It’s beautiful, durable, versatile, sustainable and cost-effective. However, when it comes to the day-to-day, sometimes hardwood floors just aren’t the most comfortable. Whether you’re trying to play on the floor with your kids or just walking around your home barefoot, here are three ways to make that hardwood flooring softer to the touch.
3 Ways to Make Hardwood Flooring More Comfortable
1. Installation add-ons. Consider the comfort factor before you install your hardwood floors. Radiant heating, for example, can warm your flooring so your feet can stay nice and warm as you walk barefoot from one room to the next, even during the cold winter months. As an added bonus this can save on your monthly heating bills!
Another factor to consider during installation is underlayment. Adding materials like foam or cork beneath your hardwood flooring can add a bit of cushion as you stand or walk around your home; this type of underlayment can add moisture protection, thermal insulation and sound dampeners, too!
2. Invest in an area rug. This common decor item is a great way to add a bit of your personality in a practical way. They're great for spaces you plan to play with the kids and can protect your hardwood flooring in high traffic areas.
3. Get creative. Depending on how you want to use the area, be creative with what you already have! For example, if you’re planning a sleepover in your living room and don’t want to spend the night tossing and turning on your hardwood floors, move a few mattresses from unused beds or couch cushions into the space. Or lay down cushy blankets and indoor mats to reinvent the floor into the foundation for a soft, comfortable party room.
Want more ideas to make your hardwood flooring more comfortable? Come to our showroom and talk to our experts! They can also tell you more about alternative materials that might be a good fit for your family’s lifestyle, like marmoleum or luxury vinyl tile. Be sure to contact us for a free in-home estimate, too!
Dear Bob and Betsy, I’m nearing the end of my new flooring project – I love my new look! However, I have a lot of waste leftover. How am I supposed to dispose of laminate flooring? Thanks!
– Chuck B.
Dear Chuck,
Congratulations on your new floors! We’ve found that there’s always a huge sense of accomplishment after finishing up a flooring project. The last step – disposing of the mess – isn’t something you have to worry about.
Laminate flooring is made of 80% wood. That means that much of it can be recycled. Before you start filling your dumpster, there are a few things to consider.
What type of waste do you have?
Basic flooring installation supplies can be safely thrown away in your dumpster when you are finished. No extra measures for clean up required! Laminate planks can also be burned due to the percentage of wood it is comprised of.
Flooring debris is another story.
Did you rip up old flooring to make room for the new?
If so, you probably have a large pile of debris ready to be thrown away, such as carpet. We suggest taking this to the landfill instead of filling your dumpster with it. This is especially true if the flooring you tore up was any type of hardwood or laminate, which can be recycled.
The landfill is able to recycle the flooring, which is better for the environment. As much as 85% of laminate flooring can be put back into production. This often comes out in the form of woodchips or fibers.
Are you keeping enough leftover planks?
The good thing about laminate flooring is that it’s so easy to replace damaged planks. Keeping 5% – 10% of your laminate flooring on hand will help you switch out any planks that might become damaged due to unexpected flooding, scratches, or chips.
Many times, manufacturers stop making certain styles of laminate flooring. If that’s the case with you, you might not be able to buy your exact style of laminate when you need it. Having your extra supply on hand will help you avoid the need to replace all of your floors. You can also recycle left over planks as a DIY project. Check out how DIY Inspired uses planks in her crafts.
Congratulations again on your final project! We invite you to show off your hard work by sharing a picture of your new floors with us on Facebook. We always love to see what our customers have accomplished.
Have any other questions about the disposal of flooring? Ask in the comments below!
Many years ago, a book called "Color Me Beautiful" came out. (I think it was in the 80s?)
Anyway, it classified your hair and skin tone as a season of the year. There were kits with fabric swatches that you could throw onto your shoulders to help you discover if you were a winter, spring, summer, or fall. We used to attend color parties where an “expert” would give us our color season after testing the swatches on us.
Well, I was a “winter”. And guess what…
I swear to you that this method was the most dead-on, accurate way to tell which colors looked best on you for fashion and make-up.
“Winter” people look good in cool colors, blacks, whites, and jewel tones. They typically have dark hair, dark eyes, fair skin, and a really striking, high contrast coloring. I would classify the Kardashians as winters.
How does this apply to interior design, you ask? Well...
I’ve discovered that this color system also applies to interiors.
That’s right. I’ve found — especially with many of my female clients — that their personal seasonal coloring often reveals which colors they’d prefer to have in their homes. It’s like they naturally gravitate to them.
Now I don’t purposefully design this way. However…
I’ve definitely noticed a trend at play here. Because, after all, people are naturally comfortable in environments that reflect their own color preferences.
I’ve designed rooms for people where we’re done, I’ve felt like the room sooooo fit the client — as in I could see that person in that space without them even being there.
I wish I could photograph each client with the space I’ve done for them so you could understand...
It’s true: This color system is effective.
Instead, however, I've captured shots of some celeb homes that I think look like the seasonal coloring of their celebrity homeowners. See what you think.
Winter:
“Your coloring is crisp and distinctive. Winters are rich and intense in hair and eye color. You receive compliments in bold shades, black white, red and jewel tones.”
— Color Me Beautiful
Kim Kardashian has such high contrast in her homes: dark blacks and very light whites. She’s definitely a winter.
Autumn:
“Your natural coloring is fiery, earthy, golden and natural. The Autumn palette is easy to remember if you think about a beautiful Autumn landscape. You can wear both muted and rich, warm colors like the autumn foliage or exotic spice colors. You receive compliments in shades of the autumn season: moss, rust, terra cotta.”
— Color Me Beautiful
Jennifer Aniston looks to be an autumn to me. Decide for yourself by checking out the color scheme in her room that was published in Architectural Digest.
Summer:
“Your overall coloring is the most delicate and understated of all the seasons. Summer is the serenity palette, so you should always avoid harsh contrasts by keeping the entire look calm and in complete harmony. You receive compliments in pastel shades of rose, periwinkle, sage.”
— Color Me Beautiful
Martha Stewart has always looked like a summer to me. And guess how she continually decorates... That’s right: in soft color palettes that are easy on the eye and often in pastel shades. And guess what... They look great around her!
Spring:
Here are some celebs I believe to have spring coloring: Cameron Diaz, Taylor Swift, Reese Witherspoon. However, it doesn’t appear to me that their home decor reflects their own personal coloring at all. I couldn’t find a “spring” celeb whose home accurately colored them as being “beautiful”. Maybe throwing a few pillows in there with some clear, bright sunny shades would do the trick?
“Your coloration is bright and sunny. Select colors that look as if they are bathed in sunlight. Your best color will mirror the color of your eyes. You receive compliments in bright shades: turquoise, watermelon, salmon.”
— Color Me Beautiful
Cameron’s home was done by Kelly Wearstler, who I believe is an autumn. To me, the color palette is all autumn.
Taylor Swift’s NYC apt. is rather dull and very “autumn” in coloring.
Reese Witherspoon’s home is gorgeous, but it lacks much color to accent her beautiful skin tone.
So tell me…
Do you gravitate towards color in your home decor that also looks good when you wear it?
I’d love to hear about your experiences in the comments below. ;-)
We’re so excited with the progress we’ve made in our fourth bedroom over the course of the year. The boiler that took up a huge chunk of the space has been moved into the cellar, we’ve had the roof repaired so that it no longer rains in through the ceiling (which we’ve repaired, too), had...
I’m redecorating in the studio above our garage so I went in search of new window panels – 8 in total – 4 to frame the 72” window, a set for the French doors, and 2 for the smaller windows beside the bed. I wanted panels all in the same fabric for a cohesive feel since the living and sleeping spaces in this studio are open to each other.
My approach to dressing windows varies, the first thing that grabs me has to be the fabric, sometimes I’ll design it myself but often it’s a pattern I spy in a fabric store or retail store that I just love at first sight. Over the years, I’ve had curtains custom made, I’ve sewn my own with with designer fabric, but I’ve used simple store bought curtains if the size and price is right and the fabric is good quality. If unlined, I’ll add $4/yard liner if the window can be seen from the outside.
The sale price for these store bought 96” panels caught my eye and to design and print a similar pattern would have cost more than twice as much so instead I ordered 8 of them. I’ll hem them to the proper length and then add rings on top. Funny, the green versions hang in my dining room and now I have the navy versions too, I just love this curvy brushstroke print! I’ll share the redecorated studio space in the upcoming weeks…
I’m drawn to single color or tone on tone patterned curtains which repeat one of the colors in the space, be it a neutral or a colorful hue, it’s one of the simplest way to make a room feel layered and interesting. I rounded up a dozen favorites I spied online, all of them under $50.
A word on hanging curtains at the proper length, typically retailers will photograph curtains hung on a rod placed just above the window frame like in all the examples above, but this is a practice I don’t follow.
While the patterns are pretty, the panels should be hung at a minimum halfway between window and ceiling. Any designer will tell you, the closer to the ceiling the better for a more elegant look and to make the space feel taller. I hang my curtain rods just a few inches below the ceiling. In my home where the ceilings are 9 feet I’ll always buy a 96” curtain and hem it to a length between 92 and 94”.
Finally the issue of fullness, most store bought curtains are not wider than 48 – 50” so on a window wider than 5 feet, I’ll double up the panels for adequate fullness.
What luck have you had decorating with store bought curtains?




 We’re so excited with the progress we’ve made in our fourth bedroom over the course of the year. The boiler that took up a huge chunk of the space has been moved into the cellar, we’ve had the roof repaired so that it no longer rains in through the ceiling (which we’ve repaired, too), had...


